Good Example to Create Timeline using React Native Timeline Flatlist 2021
April 04, 2021In the last tutorial we learned how to Display Internet connection status to users Using Netinfo . Today using react native timeline flatlist we are going to create timeline list.
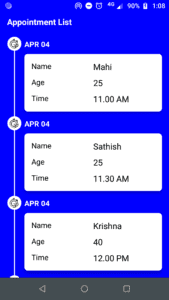
Our final output is,
React Native Timeline Flatlist
Let’s Create react native timeline project
react-native init timelineNow go to your project folder,
cd timelineNow we need to install react native timeline flatlist and moment npm package
npm i react-native-timeline-flatlist momentOnce package installation completed, let’s open project in vs code by using command code .
code .Now create folders, create src folder in root folder of the project. Inside src folder create components and assets folder.
Then inside src folder create three files MyTimeline.js, MyTimelineDescription.js and index.js Then inside src folder create assests folder and then inside assets create images folder.
src
 |
 |--assets
 |     |
 |     |---images
 |     |      |
 |     |      |---time.png
 |
 |--components
 |      |
 |      |--index.js
 |      |
 |      |--MyTimeline.js
 |      |
 |      |--MyTimelineDescription.js
 |
Let’s start coding
In MyTimeline.js paste the below code
import React from "react";
import Timeline from "react-native-timeline-flatlist";
const MyTimeline = (props) => {
  const { data } = props;

  return (
    <Timeline
      data={data}
      lineColor={"#fff"}
      circleColor={"#fff"}
      iconStyle={{ borderRadius: 20, height: 20, width: 20 }}
      iconDefault={require("../assets/images/time.png")}
      circleSize={30}
      titleStyle={{ color: "#fff", marginBottom: 10, marginTop: -5 }}
      options={{
        style: { marginLeft: -50, marginTop: 10 },
      }}
      innerCircle={"icon"}
    />
  );
};

export default MyTimeline;
Explanation:
We are importing react-native-timeline-flatlist library. This MyTimeline components receives data as props and adding few styles.
In MyTimelineDescription.js paste the below code
import React from "react";
import { View, Text, StyleSheet } from "react-native";
const MyTimelineDescription = (props) => {
  const {
    labelOne,
    valueOne,
    labelTwo,
    valueTwo,
    labelThree,
    valueThree,
  } = props;
  return (
    <View style={styles.container}>
      {Boolean(valueOne) && (
        <View style={{ flex: 1, flexDirection: "row" }}>
          <View style={{ flex: 0.5 }}>
            <Text style={styles.labelStyle}>{labelOne}</Text>
          </View>
          <View style={{ flex: 0.5 }}>
            <Text style={{ fontSize: 18 }}>{valueOne} </Text>
          </View>
        </View>
      )}

      {Boolean(valueTwo) && (
        <View style={{ flex: 1, flexDirection: "row", marginVertical: 10 }}>
          <View style={{ flex: 0.5 }}>
            <Text style={styles.labelStyle}>{labelTwo}</Text>
          </View>
          <View style={{ flex: 0.5 }}>
            <Text style={{ fontSize: 18 }}>{valueTwo} </Text>
          </View>
        </View>
      )}
      {Boolean(valueThree) && (
        <View style={{ flex: 1, flexDirection: "row" }}>
          <View style={{ flex: 0.5 }}>
            <Text style={styles.labelStyle}>{labelThree}</Text>
          </View>
          <View style={{ flex: 0.5 }}>
            <Text style={{ fontSize: 18 }}>{valueThree} </Text>
          </View>
        </View>
      )}
    </View>
  );
};
export default MyTimelineDescription;

const styles = StyleSheet.create({
  container: {
    backgroundColor: "#fff",
    // marginHorizontal: 5,
    padding: 15,
    elevation: 5,
    borderRadius: 7,
  },
  labelStyle: {
    fontSize: 16,
  },
});
Explanation:
This MyTimelineDescription component is used to display customized style of timeline. We will use this component in App.js
Inside Index.js file
import MyTimeline from "./MyTimeline";
import MyTimelineDescription from "./MyTimelineDescription";
export { MyTimeline, MyTimelineDescription };
In App.js file paste the below code
import React from "react";
import { MyTimeline, MyTimelineDescription } from "./src/components";
import {
  SafeAreaView,
  ScrollView,
  StatusBar,
  StyleSheet,
  Text,
  View,
} from "react-native";
import moment from "moment";
const dummyData = [
  {
    name: "Mahi",
    age: 25,
    time: "11.00 AM",
  },
  {
    name: "Sathish",
    age: 25,
    time: "11.30 AM",
  },
  {
    name: "Krishna",
    age: 40,
    time: "12.00 PM",
  },
  {
    name: "Kumar",
    age: 25,
    time: "12.30 PM",
  },
];
const App = () => {
  const Data = dummyData.map((item) => {
    const { name, age, time } = item;
    return {
      title: moment().format("MMM DD").toUpperCase(),
      description: (
        <MyTimelineDescription
          labelOne={"Name"}
          valueOne={name}
          labelTwo={"Age"}
          valueTwo={age}
          labelThree={"Time"}
          valueThree={time}
        />
      ),
    };
  });

  return (
    <SafeAreaView style={{ flex: 1 }}>
      <StatusBar backgroundColor={"blue"} />
      <View style={{ flex: 1, backgroundColor: "blue" }}>
        <ScrollView
          style={{ marginHorizontal: 15 }}
          showsVerticalScrollIndicator={false}
        >
          <Text style={style.title}>Appointment List</Text>
          <MyTimeline data={Data} />
        </ScrollView>
      </View>
    </SafeAreaView>
  );
};

export default App;

const style = StyleSheet.create({
  title: {
    color: "#fff",
    fontSize: 18,
    fontWeight: "bold",
    marginVertical: 10,
  },
});
Explanation:
Importing required libraries. variable dummyData is used to display sample timeline data. Variable Data return the customizable timiline list with our dummy data. Then we pass this Data variable as props to MyTimeline component
Now add time.png image inside src/assets/images. You can download image from github
Run your project now,
react-native run-androidConclusion:
Hope you learned how to create customized timeline using react native timeline flatlist library. You can get full source code from github.
If you have any doubts you can put it in comment section. Let’s see another react native tutorial

