Guidance to create node js rest API with (express js, sequelize , Mysql) and API testing using postman 2021
February 21, 2020In this tutorial, We are going to create node js rest API using express js, sequelize, and MySql and then API testing using postman.
What is express js?
Express js is a Fast, unopinionated, minimalist web framework for Node.js . Express js can be used to create Rest API quickly and easily.
What is Sequelize?
Sequelize is a promise-based Node.js ORM for Postgres, MySQL, MariaDB, SQLite and Microsoft SQL Server. It features solid transaction support, relations, eager and lazy loading, read replication and more.
What is MySql?
MySQL is the most popular Open Source Relational SQL Database Management System.
Create Node Js Rest Api Project
We have to create everything from scratch for the node js project.
Let’s create folder for our quotes project, In this tutorial, we are going to create CRUD operations for the quotes project.
mkdir quotes-apiGo into that folder, this is our node js rest api project folder. we will do remaining things inside this folder only.
cd quotes-apiWe need to initialize the node project inside quotes-api folder. To initialize type npm init in command prompt and then press enter button.
npm initAfter entering the npm init command you will see some questions, you can simply skip all questions by pressing the enter button. you can edit those details later inside the package.json file. Finally, it will prompt is this okay? (yes), just type yes and press enter button. you successfully initialized the node project.
Open the folder with your code editor. If you are using VScode then type code . in command prompt then press enter button. you can see the package.json file inside the folder, this was created by the npm init command.
We need to install few packages to create API using express sequelize and MySQL. let’s install those packages by using the npm install command. Type the below command in command prompt of the project folder and then hit enter button.
npm install express sequelize mysql2 body-parser cors joiNext, create an index.js file inside our node js rest api project folder(quotes-api) which is also called root folder. This is the main file for our project.
const express = require("express");
const bodyParser = require("body-parser");
const cors = require("cors");

const app = express();

var corsOptions = {
  origin: "http://localhost:3000",
};

app.use(cors(corsOptions));

// parse requests of content-type - application/json
app.use(bodyParser.json());

// parse requests of content-type - application/x-www-form-urlencoded
app.use(bodyParser.urlencoded({ extended: true }));

// simple route
app.get("/", (req, res) => {
  res.json({ message: "Welcome to Ms TechPro Node js rest API tutorial." });
});

// set port, listen for requests
const PORT = process.env.PORT || 3000;
app.listen(PORT, () => {
  console.log(`Server is running on port ${PORT}.`);
});
Run the below command in the command prompt
node index.jsOpen your browser with url http://localhost:3000/, you will see the output as “Welcome to Ms TechPro Node js rest API tutorial”.
We need to install Sequelize CLI package globally,
npm install -g sequelize-cliNext run the sequelize init command to initialize sequelize in our project,
sequelize inityou will see success messages. Now check your project folder you can find few new folders(config, migrations, models, and seeders) created by sequelize init command.
We need a way to restart the server every time we change something in our code. For that, we’ll use the excellent nodemon npm package.
npm i -g nodemonDatabase configuration
We need to create our MySQL database, Turn on your localhost server (I am using XAMPP, so I just turned on it). Now go to http://localhost/phpmyadmin. Create your database and in my case created a database with name quotes.
Let’s connect created a database with our project. Edit the file config/config.json ,
{
  "development": {
    "username": "root",
    "password": null,
    "database": "quotes",
    "host": "127.0.0.1",
    "dialect": "mysql"
  },
  "test": {
    "username": "root",
    "password": null,
    "database": "quotes",
    "host": "127.0.0.1",
    "dialect": "mysql"
  },
  "production": {
    "username": "root",
    "password": null,
    "database": "quotes",
    "host": "127.0.0.1",
    "dialect": "mysql"
  }
}
Based on our NODEENV the above configuration will work. you can check that inside models/index.js , const env = process.env.NODEENV || ‘development’; const config = require(__dirname + ‘/../config/config.json’)[env]; this lines is used configure database based on Node environment.
Create Model & Migrations
We are going to create Quote Model and migration using the sequelize command in our node js rest api project.
sequelize-cli model:generate --name Quote --attributes quote:string,author:string,activeStatus:integerThis will generate a quote.js file in the server/models folder as well as a
Here is the generated model code, you can add or remove columns to it, make sure to update migration file as for your changes on this model.
We are using activeStatus field for soft delete. when the user deletes the quote we are not going to delete it from the database just updating the quote’s active status with 0. Soft delete means we are not actually deleting them from the database whereas hard delete means deleting the row from the database. It is always good practice to follow the soft delete method.
After successfully created the migrations and models now we can migrate them to database by using below command, Before migrate make sure to turn on your localhost server.
sequelize db:migrateRead more about sequelize migrations here.
Creating Controllers and Routing
create controllers folder inside our project folder.
After creating the controllers folder then inside controllers folder create a QuoteController.js
QuoteController.js will be responsible for creating, listing, updating, and deleting quote.
Let’s code inside QuoteController.js. You can find explanation below this code.
const Quote = require("../models").Quote;
const Joi = require("joi");

module.exports = {
  // Create and Save a new Quote

  create(req, res) {
    //Validate the request
    const result = validateQuote(req.body);
    if (result.error) {
      return res.status(400).send({ message: result.error.details[0].message });
    }
    //If validation success
    const quote = {
      quote: req.body.quote,
      author: req.body.author,
      activeStatus: 1,
    };
    return Quote.create(quote)
      .then((quote) =>
        res.status(200).send({
          message: "Quote was created successfully.",
          quote: quote,
        })
      )
      .catch((error) =>
        res.status(500).send({ message: "Error on creating quote" })
      );
  },

  //Update a Quote by the id in the request

  update(req, res) {
    const { id } = req.params;

    //Validate the request
    const result = validateQuote(req.body);
    if (result.error) {
      return res.status(400).send({ message: result.error.details[0].message });
    }
    const quote = {
      quote: req.body.quote,
      author: req.body.author,
    };
    return Quote.update(quote, {
      where: { id: id },
    })
      .then((num) => {
        if (num == 1) {
          res.status(200).send({
            message: "Quote was updated successfully.",
          });
        } else {
          res.status(404).send({
            message: `Cannot update Quote with id=${id}. Maybe quote was not found or req.body is empty!`,
          });
        }
      })
      .catch((err) => {
        res.status(500).send({
          message: "Error updating Quote with id=" + id,
        });
      });
  },

  // Retrieve all Tutorials from the database.

  list(req, res) {
    return Quote.findAll({
      where: {
        activeStatus: 1,
      },
    })
      .then((quotes) => res.status(200).send({ quotes }))
      .catch((error) =>
        res.status(500).send({
          message: "Error on retrieving quotes",
        })
      );
  },

  // Soft Delete a Quote with the specified id in the request

  //Description: Update the active status 0 for the specified id in the request
  delete(req, res) {
    const { id } = req.params;
    return Quote.update(
      { activeStatus: 0 },
      {
        where: { id: id },
      }
    )
      .then((num) => {
        if (num == 1) {
          res.status(200).send({
            message: "Quote was Deleted successfully.",
          });
        } else {
          res.status(200).send({
            message: `Cannot update Quote with id=${id}.`,
          });
        }
      })
      .catch((err) => {
        res.status(500).send({
          message: "Error updating Quote with id=" + id,
        });
      });
  },
};

//Validation function
function validateQuote(quote) {
  const schema = Joi.object({
    quote: Joi.string().min(30).required(),
    author: Joi.string().min(3).required(),
  });

  return schema.validate(quote);
}
Explanation: To Create new quote,
//Validation function
function validateQuote(quote) {
  const schema = Joi.object({
    quote: Joi.string().min(30).required(),
    author: Joi.string().min(3).required(),
  });

  return schema.validate(quote);
}
The above validateQuote function is used to check the quote must be minimum 30 characters and author must be 3 characters. you can write more validation rules you can refer official Joi documentation.
create(req, res) {
    //Validate the request
    const result = validateQuote(req.body);
    if (result.error) {
      return res.status(400).send({ message: result.error.details[0].message });
    }
    //If validation success
    const quote = {
      quote: req.body.quote,
      author: req.body.author,
      activeStatus: 1,
    };
    return Quote.create(quote)
      .then((quote) =>
        res.status(200).send({
          message: "Quote was created successfully.",
          quote: quote,
        })
      )
      .catch((error) =>
        res.status(500).send({ message: "Error on creating quote" })
      );
  },
create is the function name we can give any understandable name. We are validating the req.body with a validation function. If there is any error it will send us the error otherwise quote will create successfully.
we are creating quote object with quote, author and activeStatus, These 3 must be the same as what we created in the quote models. Then we pass quote object to quote.create function. Quote.create(quote) is responsible to create quote in database. you can read more about model querying basics here.
Hope you can understand list, update and delete of node js rest api functions we created inside controllers. If you have any doubts you can ask in the comment section.
Next we are going to create routing for our create, list, update and delete functions in the controller.
Routing: The next important thing in node js rest API is routing.
Create routes folder inside the root project. Then inside the routes folder create QuoteRoutes.js. It is always best practice to create a separate route file for each controllers. It will be helpful when the project grows.
Let’s code inside QuoteRoutes.js file,
module.exports = (app) => {
  const quotes = require("../controllers/QuoteController");

  var router = require("express").Router();

  // Create a new quote
  router.post("/", quotes.create);

  // Retrieve all quotes
  router.get("/", quotes.list);

  // Update a quote with id
  router.put("/:id", quotes.update);

  // Delete a quote with id
  router.delete("/:id", quotes.delete);

  app.use("/api/quotes", router);
};
we are creating four routes to access create, list, update and delete functions inside QuoteController.js. /api/quotes is the URL for quotes.
After creating QuoteRoute.js we must include this file inside root folder’s index.js file.
// Quote route
require("./routes/QuoteRoutes")(app);
The updated index.js file is,
const express = require("express");
const bodyParser = require("body-parser");
const cors = require("cors");

const app = express();

var corsOptions = {
  origin: "http://localhost:3000",
};

app.use(cors(corsOptions));

// parse requests of content-type - application/json
app.use(bodyParser.json());

// parse requests of content-type - application/x-www-form-urlencoded
app.use(bodyParser.urlencoded({ extended: true }));

// simple route
app.get("/", (req, res) => {
  res.json({ message: "Welcome to Ms TechPro Node js rest API tutorial." });
});
// Quote route
require("./routes/QuoteRoutes")(app);

// set port, listen for requests
const PORT = process.env.PORT || 3000;
app.listen(PORT, () => {
  console.log(`Server is running on port ${PORT}.`);
});
Now run the project using nodemon command, In the project path of command prompt type nodemon and click enter
nodemonYou can see the server is running on port 3000. We successfully created node js rest API using express js, sequelize, and MySQL.
Let’s test our APIs using postman.
API Testing Using Postman
We must test all our API using postman or anyother api testing tool. In this tutorial we are going to use postman to test our API’s.
Before begin to test api we must download postman or you can use web version of postman. Here is the link to download postman from official website. I am going to explain with downloaded postman version. Both webversion and dowloaded versions are almost similar.
Step 1 is we need to create a collection in postman. Collection means a project which consists of all APIs route. Click create a collection in postman give it a name, myself give it as Quotes and description is optional. Click create button to create your collection.
Now we are going to create 4(Create,List, Update and Delete ) API requests in the collection.
Create Quote Request:
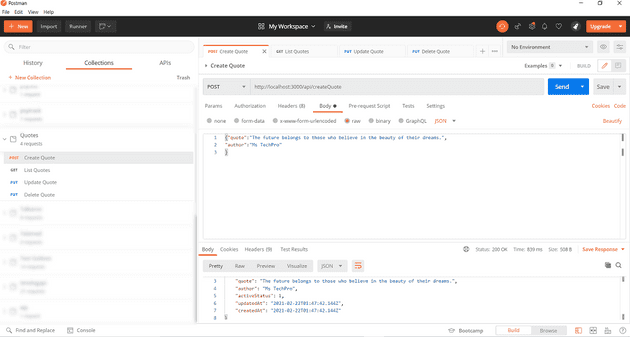
Go to your collection right-click on it and choose Add Request. Then give the request name as Create Quote and click the Save button. Choose the Create Quote and Change the method to Post and enter create quote URL created earlier, mine is http://localhost:3000/api/createQuote. Now choose the body and then choose raw and then change Text to JSON.
Now inside the big text box add the below lines,
{
  "quote": "The future belongs to those who believe in the beauty of their dreams.",
  "author": "Ms TechPro"
}
This is what we received as req.body.quote and req.body.author inside QuoteController create function. Press save button or press ctrl + s to save our request in postman.
Now press send button which is next to our URL. you will see the response below in the postman. If you enter less than 30 characters quote and less than 3 characters author name, failure message will be shown in postman you can check it out.
List Quote Request:
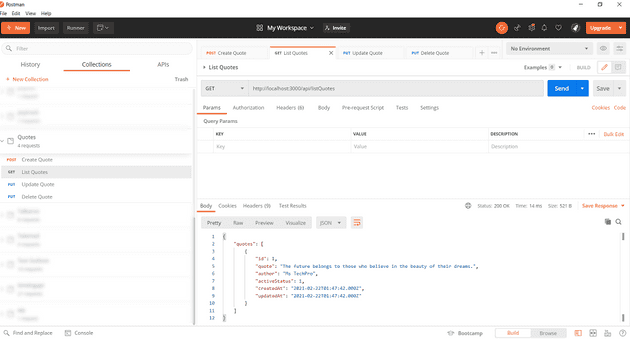
Again choose a collection and Add Request and give it the name as “List Quotes”. Now choose List Quotes request we created. List quote is GET method so left as it is. Add the list quote URL created earlier, mine is http://localhost:3000/api/listQuotes. We don’t need any additional changes for Get Request. Press save button to save your request.
Now click send button. you will get a quote list as response in postman.
Update Quote Request:
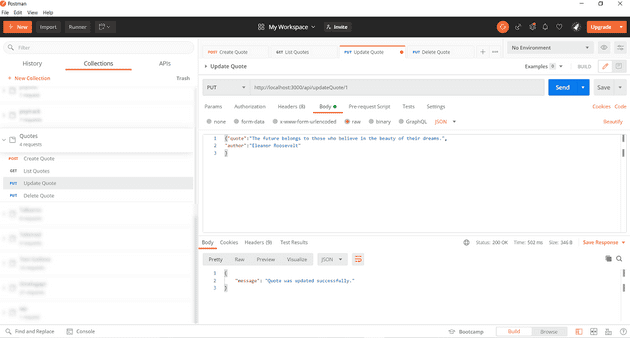
Once Again choose a collection and Add Request and give it the name as “Update Quote”. Now choose Update Quote request we created. Update quote is Put method so change it to PUT. Add the update quote URL created earlier, mine is http://localhost:3000/api/updateQuote/1.Here 1 refer to the id of the quote. Similar to the post method choose body and then choose raw and then JSON.
Now inside the big text box add the below lines,
{
  "quote": "The future belongs to those who believe in the beauty of their dreams.",
  "author": "Eleanor Roosevelt"
}
Update quote with original author Eleanor Roosevelt. Save your request and next, we are going to create Delete Request.
Now press send button. you will get a response below in postman.
Delete Quote Request:
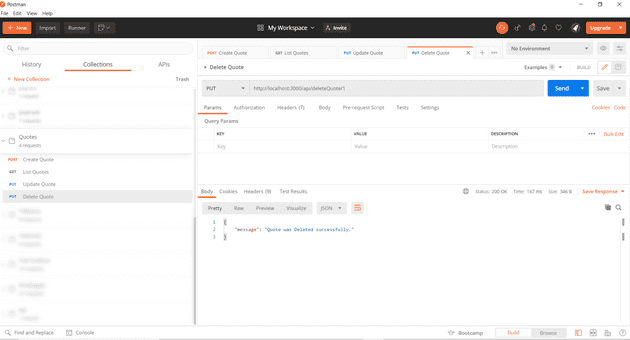
Create Delete Quote request in postman and choose it. Add the delete quote URL http://localhost:3000/api/deleteQuote/1. And change the method to PUT and save the request.
Now press send button. you will get a response below in postman.
Now test your list quote API. you will get an empty list.But go to your database you still can find the quote here. Just active status is changed to 0. This is the advantage of soft delete.
you can get the source code of this project from GitHub.
Conclusion:
I hope you learned how to create node js rest api with express js, sequelize and mysql. And then learned how to validate api and API testing using postman.
If you encounter any problem, please ask it in a comment I can help you to solve it.
Recent blog: Complete Guidance to Create React Native Redux CRUD App
